Grad CAM 톺아보기
grad CAM
(Grad-CAM: Visual Explanations from Deep Networks via Gradient-based Localization)
Abstract
CAM(class activation mapping)과 유사하게 CNN 모델로부터 input data의 ‘중요한(important)’영역을 시각화 시켜주는 기술이다.
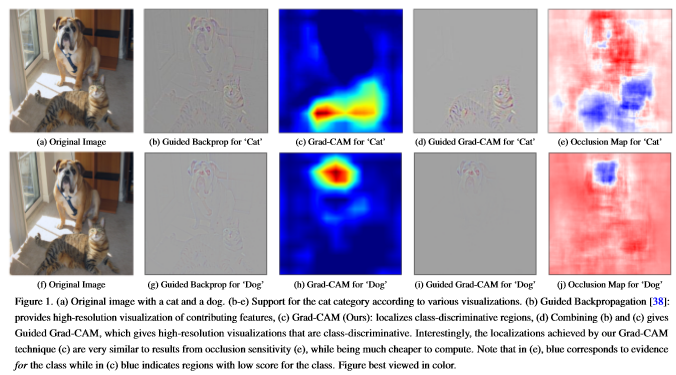
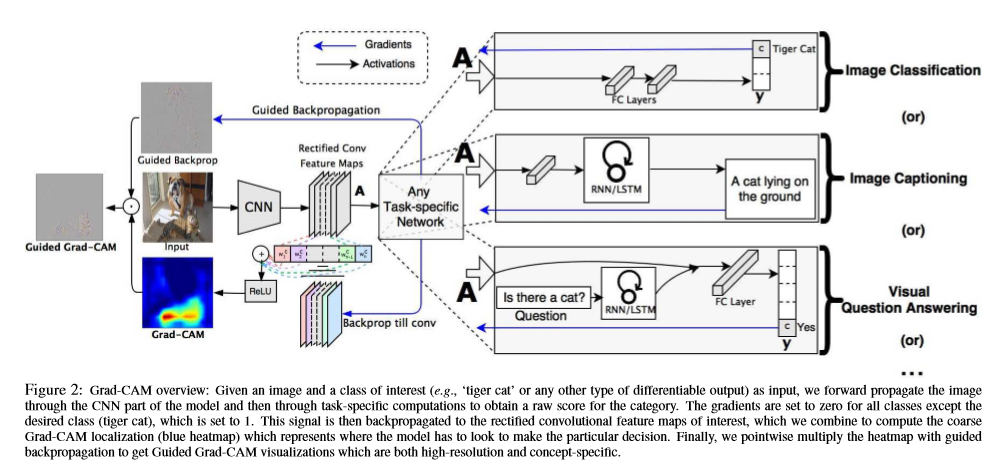
Grad-CAM은 CNN의 각 class마다 마지막 convolutional layer로 가는 gradient 정보를 사용해 이미지에서 중요한 영역의 대략적인 localization map을 만들어낸다.
즉, CAM이나 Grad-CAM으로 모델을 학습시키는 사람들이 어떠한 class를 잘 예측하는지에 대한 신뢰도를 향상시킨다.(약한 모델, 강한 모델)
Introduction
누구나 모델을 학습시킬때 결과물이 좋지 않다면 왜 좋지 않은지 궁금하다.(나 또한..) 그래서 딥러닝을 의미있게 학습시키기 위해서는 어떻게 모델이 data를 예측하는지에 대해서 설명할 수 있는 명확한 모델을 만들어야한다. 그래서 이 논문에서는 Grad-CAM을 제안하였고 위에 그림을 보면 원하는 class의 object가 어디에 존재하는지 시각화를 해줄수 있다.
- 이 논문에서는 기존의 모델의 구조를 변경하지 않고 시각적인 설명을 생성하는데 사용할 수 있는 Grad-CAM을 제안한다.(CAM과의 차이점)
- 모델의 신뢰성을 높일 수 있고 약한 모델과 강한 모델을 구분지을수 있게 돕는다.
기존의 CAM은 fully conntected layer를 convolutional layer, global average pooling으로 대체하면서 CNN 모델의 구조를 변경시킨다.
1
2
3
4
5
6
7
8
9
                     Feature Maps(final convolutional layer output)
                                           |
                                       (weights)
                                           |
                                  Global Average Pooling
                                           |
                                       (weights)
                                           |
                                        Softmax
GAP(global average pooling)이 없다면 weights로 CAM을 구하는 작업을 할 수 없기 때문에 마지막 layer에 GAP이 무조건 있어야한다. 이러한 구조는 일반 모델과 비교해서 정확도가 낮아지거나 다른 작업(image captioning, visual question answering 등..)에는 적용할 수 없다(Softmax가 없는 경우).
Grad-CAM은 이러한 단점을 보완시키기 위해서 gradient를 이용해서 feature map을 결합 하는 새로운 방법이다.
image captioning
이미지가 무엇에 관한 이미지인지 caption(문장)을 달아주는 작업
visual question answering
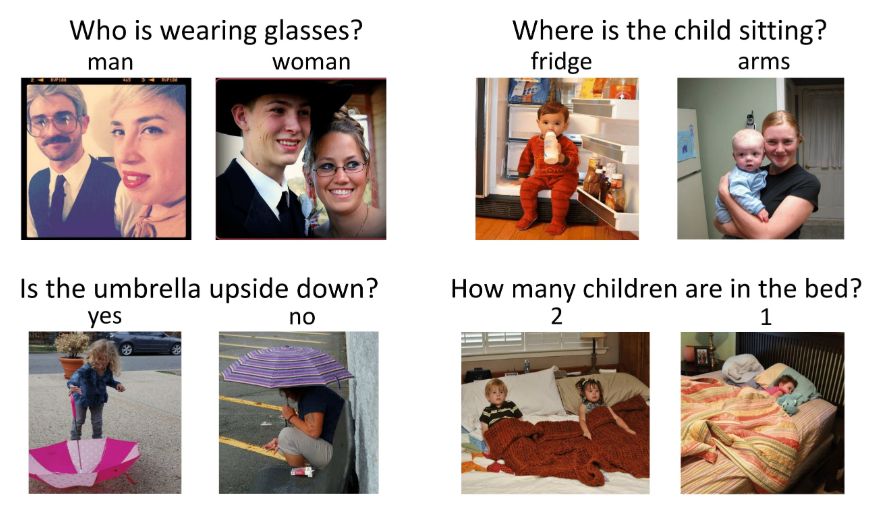
이미지가 무엇인지에 대한 질문이 주어질 때 질문에 대한 정답을 알아내는 작업
CAM
- output
- \(\frac{1}{Z} \sum_i \sum_j\) : global average pooling
- \(w_k^c\) : class feature weights
\(A_{ij}^k\) : feature map
- CAM
- linear combination
- \(w_k^c\) : class feature weights
- \(A^k\) : feature map
- 0 ~ 1 사이로 normalization
Grad CAM
convolutional layers에서는 fully conntected layers에서 손실 되는 spatial infomation을 유지한다. 즉, 마지막 convolutional layers에 좋은 high level semantics과 detailed spatial information을 가진다.
Grad CAM은 모든 layers에서 activations를 설명 가능하지만, 이 논문에서는 output layer에 초점을 맞춘다.
- \(c\) : class
- \(y^c\) : softmax 이전의 output
- \(A^k\) : convolutional layer feature map activations
- \(\frac{\partial y^c}{\partial A^k}\) : y가 A에 미치는 영향(기울기)
- \(\alpha_k^c\) : importance weights
Grad-CAM은 위와 같이 표현되고 linear combination 후에 ReLU를 적용시킨다. ReLU를 적용시키는 이유는 선택한 class에 positive한 영향을 주는 feature에만 관심이 있기 때문이다. negative pixels(<0)는 선택한 class와는 다른 class에 속할 수 있다.
Grad-CAM generalizes CAM
위에서 적은 CAM에 대한 수식에서 \(F^k = \frac{1}{Z} \sum_i \sum_j A^k_{ij}\) 를 적용시키면 \(Y^c = \sum_k w^c_k \cdot F^k\) 로 표현할 수 있다.
\(w_k^c\) 는 c번째 class, k번째 feature map의 weight
일반화를 하기 위해 \(Y^c\) 를 \(F^k\) 에 대해서 미분
\[\frac{\partial Y^c}{\partial F^k} = \frac{\frac{\partial Y^c}{\partial A^k_{ij}}}{\frac{\partial F^k}{\partial A^k_{ij}}}\]아까 위에 식을 보면 \(F^k = \frac{1}{Z} \sum_i \sum_j A^k_{ij}\) 이므로 \(\frac{\partial F^k}{\partial A^k_{ij}} = \frac{1}{Z}\) 로 볼 수 있다.
따라서
\[\frac{\partial Y^c}{\partial F^k} = \frac{\partial Y^c}{\partial A^k_{ij}} \cdot Z\]또 위에 식을 보면 \(Y^c = \sum_k w^c_k \cdot F^k\) 이므로 \(\frac{\partial Y^c}{\partial F^k_{ij}} = w_k^c\) 로 표현 할 수 있다.
즉,
\[w_k^c = Z \cdot \frac{\partial Y^c}{\partial A^k_{ij}}\]모든 픽셀 \(\left (i, j \right )\) 에 대해서 전부 합하면
\[\sum_i \sum_j w_k^c = \sum_i \sum_j Z \cdot \frac{\partial Y^c}{\partial A^k_{ij}}\]\(Z, w_k^c\) 는 \(\left (i, j \right )\) 에 의존하지 않으므로
\[Zw_k^c = Z \sum_i \sum_j \frac{\partial Y^c}{\partial A^k_{ij}}\]\(Z\) 는 feature map의 픽셀의 수다. 그러므로
\[w_k^c = \sum_i \sum_j \frac{\partial Y^c}{\partial A^k_{ij}}\]시각화를 하는데 정규화되는 비례 상수(\(\left ( \frac{1}{Z} \right )\)) 까지 \(w_c^k\)는 Grad CAM에서 \(\alpha_c^k\) 따라서 Grad CAM은 CAM의 일반화다. 즉, gradient를 사용해서 weights를 구해 CAM을 만들수 있고 기존의 CAM과 달리 GAP이 없어도 gradient를 이용하기 때문에 어떤 layer에서도 가능하다는 의미다.
Guided Grad-CAM
Grad CAM은 class를 구분하고 관련된 이미지 영역을 localization하지만 heatmap형식으로 표현되기 때문에 세부적인 특징을 강조해서 표현 할 수는 없다.
Guided Backpropagation은 ReLU layer를 통해서 backpropagation할 때 gradient가 negative인 pixel은 없애고 positive인 pixel을 남겨서 시각화 시키는 방법이다.
결론적으로 Guided Backpropagation의 장점과 Grad-CAM의 장점을 결합해서 시각화를 하는 것이 Guided Grad-CAM이다.
미리학습 시킨 모델이 있다고 가정하고 진행한다. 나는 STL10 데이터셋을 이용해서 미리 학습시켜 놓았다.
- Model : ResNet18
- Datasets : STL10
1
2
3
4
5
6
7
8
9
10
11
12
13
14
15
16
17
18
19
20
21
22
23
24
25
26
27
28
29
30
31
32
33
34
35
36
37
38
39
40
41
42
43
44
45
46
47
48
49
50
51
52
53
54
55
56
57
58
59
60
61
62
63
64
65
66
67
68
69
70
71
72
import torch
from PIL import Image
import matplotlib.pyplot as plt
from torch.nn import functional as F
import torchvision.transforms as transforms

if torch.cuda.is_available():
    device = 'cuda'
    torch.set_default_tensor_type('torch.cuda.FloatTensor')
else:
    device = 'cpu'
    torch.set_default_tensor_type('torch.FloatTensor')

# STL10 class name
class_name = ['airplane', 'bird', 'car', 'cat', 'deer', 'dog', 'horse', 'monkey', 'ship', 'truck']

# 모델 불러오기
model = ResNet18().to(device)
model.load_state_dict(torch.load('PRETRAINED_MODEL_PATH'))
model.eval()

# 이미지 불러오기
img_path = 'TEST_IMG_PATH'
img = Image.open(img_path)

# 테스트 할 이미지 변환하기(resize, tensor)
cvt_tensor = transforms.Compose([transforms.Resize((128,128)),
                                 transforms.ToTensor()])
tensor_img = cvt_tensor(img).to(device)
tensor_img = tensor_img.view(1, 3, 128,128)

# gradient를 가져올 hook 함수
gradients = []

def save_gradient(grad):
    gradients.append(grad)

datas = Variable(tensor_img)

feature = datas[0].unsqueeze(0)

# model forward
for name, module in model.named_children():
    print(feature.shape)
    if name == 'Linear':
        feature = feature.view(feature.size(0), -1)
    feature = module(feature)
    if name == 'FINAL_CONV_NAME':
        feature.register_hook(save_gradient)
        final_conv = feature

# model backward
target = np.argmax(feature.cpu().data.numpy())
one_hot_output = torch.cuda.FloatTensor(1, feature.size()[-1]).zero_()
one_hot_output[0][target] = 1

feature.backward(gradient=one_hot_output, retain_graph=True)

# Grad CAM 계산하기
final_conv = final_conv.squeeze(0)

weight = gradients[0].mean(dim=-1, keepdim=True).mean(dim=-2, keepdim=True)
weights = torch.mean(gradients[0], [0,2,3]).cpu().numpy()

activations = final_conv.detach().cpu().numpy()

mask = F.relu((weight * final_conv).sum(dim=1)).squeeze(0)
mask = mask.detach().cpu().numpy()

# scaling
mask = mask - np.min(mask)
mask = mask / np.max(mask)
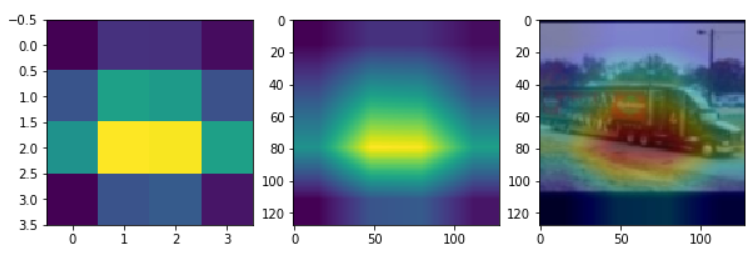
Grad CAM을 계산하는 과정을 거친뒤 Heatmap을 출력한다.
1
2
3
4
5
6
7
8
9
10
11
12
13
14
15
16
17
18
19
20
21
22
# 출력하기
import cv2

fig, axs = plt.subplots(1, 3, figsize=(10,10))

axs[0].imshow(mask)

resized_cam = cv2.resize(mask, (128, 128))

axs[1].imshow(resized_cam)

heatmap = cv2.applyColorMap(np.uint8(255 * resized_cam), cv2.COLORMAP_JET)

img = cv2.imread(img_path)
img = cv2.resize(img, (128,128))
heatimg = heatmap*0.3 + img*0.5
cv2.imwrite('./grad_cam.jpg', heatimg)

grad_cam_img = cv2.imread('./grad_cam.jpg')
grad_cam_img = cv2.cvtColor(grad_cam_img, cv2.COLOR_BGR2RGB)

axs[2].imshow(grad_cam_img)


