Visualising Image Classification Models and Saliency Maps 톺아보기
Visualising Image Classification Models and Saliency Maps
(Deep Inside Convolutional Networks: Visualising Image Classification Models and Saliency Maps)
- paper : https://arxiv.org/abs/1312.6034
Saliency Maps란?
- 돌출맵
- Saliency Maps은 일종의 이미지를 분할이다. 어떠한 관심 영역을 추출하는 것을 말한다.
Abstract
이 논문은 image classification model의 visualization에 대한 내용이다. input image에 대한 class score에 gradient를 계산하는 데 기반한 두 가지 시각화 기술을 기반으로 한다.
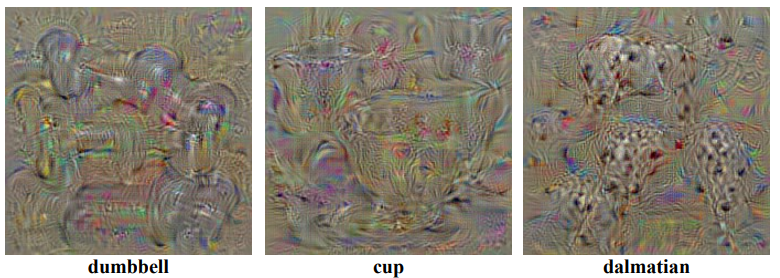
image를 생성해서 class score를 최대화 시키고 CNN에 의해 캡쳐 된 class의 concept을 시각화 한다.
주어진 image와 class의 class saliency map을 계산한다.(weakly supervised learning에 사용할 수 있다.)
Introduction
이전 연구에서는 image space에서 gradient ascent를 사용해 최적화를 해서 모델이 관심을 가지는 뉴런을 최대화하는 input image를 찾아서 시각화 하였다. 이 방법은 DBN(Deep Belief Network)과 같은 unsupervised 방식으로 hidden feature layers를 시각화 하는 데 사용하였고 나중에 auto-encoder로 시각화 하는데 사용된다.
이 부분에서는 Auto Encoder를 알아가면 좋을 것 같아서 따로 포스팅을 할 것이다.
이 논문에서는 ImageNet pretrained model을 사용해서 시각화를 설명한다. 이 논문은 3가지 contributions를 하였다.
input image의 numerical optimisation(수치 최적화)를 사용해서 시각화 할 수 있다는 것을 보여준다. 이전 연구와 달리 supervised 방식을 사용하였기 때문에 최종으로 나오는 fully connected layer에서 어떤 뉴런을 최대화시켜야 할 지 알고 있다.
single backpropagation을 통과시켜서 image-specific class saliency map을 구하는 방법을 제안한다.
gradient-based 시각화 방법이 deconvolution network를 재구성하는 절차를 일반화 하는 것을 보여준다. 논문 참고
Class Model Visualization
이 section에서는 CNN에서 학습한 class models을 시각화하는 기술에 대해 설명한다. 학습이 된 모델과 관심 class가 주어지면 이미지를 수치적으로 생성하는 것으로 구성된다.
\[argmax_I S_c (I) - \lambda \left \| I \right \|^2_2\]- \(c\) : class
- \(I\) : image
- \(S_c (I)\) : class의 score
- \(\left \| \right \|^2_2\) : L2 regularised
- \(\lambda\) : regularisation parameter
backpropagation을 이용해서 locally optimal \(I\) 를 찾을 수 있다. 이 절차는 CNN의 학습 절차와 관련이 있고 backpropagation은 weights를 최적화 하는데 사용된다.
차이점은 input image와 관련해서 최적화가 진행되고 weights는 학습할 때 찾은 weights로 고정한다는 것이다.
softmax를 사용하지 않고 class score를 사용한다. 왜냐하면 다른 class의 score를 최소화해서 posterior(뒷부분)를 최대화 시키기 때문이다. 그래서 \(S_c\)만 최적화 한다.
Image-Specific Class Saliency Visualisation
In this section we describe how a classification ConvNet can be queried about the spatial support of a particular class in a given image.
\[S_c(I) = w^T_c I + b_c\]score의 영향을 기준으로 image의 pixel에 대한 순위를 매길 수 있다. image는 1차원으로 표현된다. 이 경우 weights가 image pixel의 중요성을 정의한다는 것을 알 수 있다.
하지만 깊은 CNN 같은 경우 score는 비선형 함수다. 그래서 위의 공식을 바로 적용할 수 없다. 그렇지만 image가 주어지면 score를 근사할 수 있다.(Taylor expansion)
\[S_c(I) \approx w^T I + b_c\]여기서 \(w\)는 image에 대한 score의 미분이다.
\[w = \frac{\partial S_c}{\partial I}\]도함수의 크기는 class score에 영향을 미치기 위해 가장 적게 변경되어야하는 pixel을 나타낸다.
테일러 급수
무한히 미분되는 미지의 함수를 근사 다항 함수로 표현하는 것
Class Saliency Extraction
Saliency Maps를 계산하려면 먼저 derivative weights를 backpropagation을 통해서 구한다. 그리고 weights를 재배열해서 Saliency Maps을 얻는다.(\(M \in R^{m \times n}\))
gray image의 경우 weights수와 image의 pixel수와 동일하기 때문에 \(M_{ij} = \left \| w_{h(i,j)} \right \|\)로 계산한다. 여기서 \(h(i, j)\)는 i번째 행과 j번째 열의 image pixel에 해당하는 weights의 index다.
RGB image의 경우는 단일 class의 Saliency Maps를 얻기 위해서 모든 channels에 대한 최댓값을 취한다. 즉, \(M_{ij} = max_c \left \| w_{h(i, j, c)}\right \|\)
Weakly supervised Object Localisation
Saliency Maps은 image의 위치를 encoding하기 때문에 object의 위치를 찾는 곳에서도 사용할 수 있다.
colour segmentation을 사용하면 Saliency Maps이 object와 가장 차별적인 부분만 얻으려고 하기 때문에 saliency thresholding으로는 전체 object를 나타내기 어려울 수 있다. 따라서 thresholded map을 object의 다른 부분으로 전파 할 수 있어야 하기 때문에 colour continuity cues를 사용한다.
foreground model은 saliency가 threshold 보다 높은 pixel로 추정 되었고 saliency 분포의 95%보다 큰 pixel을 선택한다.
background model은 saliency사 30%보다 작은 pixel을 선택한다.
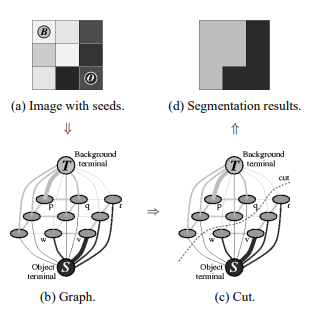
그런다음 GraphCut segmentation을 사용했다. foreground와 background가 계산되면 foreground에서 가장 연결이 크게 된 component로 설정된다.
GraphCut Segmentation
- paper : Interactive graph cuts for optimal boundary and region segmentation of objects in N-D images
pixel을 Graph로 연결해서 cut해서 segmentation 하는 방법론
Code
위에 Saliency Maps은 backpropagation 할 때 score만 backpropagation 해주면 될 것 같다.. 하지만 이미지를 수치적으로 생성하는 부분이 이해가 안간다.
코드로 개념을 구현한게 있어서 참조하면서 볼려고 한다.
Import
1
2
3
4
5
6
7
8
import os
import copy
import torch
import numpy as np
from PIL import Image

from torch.autograd import Variable
from torch.optim import SGD
CPU / GPU 설정
1
2
3
4
5
6
if torch.cuda.is_available():
    device = 'cuda'
    torch.set_default_tensor_type('torch.cuda.FloatTensor')
else:
    device = 'cpu'
    torch.set_default_tensor_type('torch.FloatTensor')
Model Load
자신이 학습시킨 모델을 넣거나 pytorch 기본 모델을 넣어도 좋다. class number만 기억하면 된다. 나는 CIFAR10 데이터셋으로 미리 학습 시켜놓은 모델을 사용하였다.
1
2
3
4
5
model = YOUR_MODEL().to(device)

model.load_state_dict(torch.load('MODEL_PATH'))
# evaluation
model.eval()
preprocessing
정규화하고 image를 tensor 형태로 변환시켜주는 함수
1
2
3
4
5
6
7
8
9
10
11
12
13
14
15
16
17
18
19
def preprocess_image(img):
    mean = [0.4914, 0.4822, 0.4465]
    std = [0.2023, 0.1994, 0.2010]

    im_as_arr = np.float32(img)
    im_as_arr = im_as_arr.transpose(2, 0, 1)

    # 채널 정규화
    for channel, _ in enumerate(im_as_arr):
        im_as_arr[channel] /= 255
        im_as_arr[channel] -= mean[channel]
        im_as_arr[channel] /= std[channel]

    # tensor
    im_as_ten = torch.from_numpy(im_as_arr).float()
    im_as_ten.unsqueeze_(0)
    im_as_var = Variable(im_as_ten, requires_grad=True)

    return im_as_var
recreate
최적화 시킨 이미지를 다시 재구축해서 다시 학습에 쓸수 있도록 한다.
1
2
3
4
5
6
7
8
9
10
11
12
13
14
def recreate_image(im_as_var):
    reverse_mean = [-0.4914, -0.4822, -0.4465]
    reverse_std = [1/0.2023, 1/0.1994, 1/0.2010]
    recreated_im = copy.copy(im_as_var.cpu().data.numpy()[0])
    for c in range(3):
        recreated_im[c] /= reverse_std[c]
        recreated_im[c] -= reverse_mean[c]
    recreated_im[recreated_im > 1] = 1
    recreated_im[recreated_im < 0] = 0
    recreated_im = np.round(recreated_im * 255)

    recreated_im = np.uint8(recreated_im).transpose(1, 2, 0)

    return recreated_im
save image
1
2
3
4
5
6
def save_image(im, path):
    if isinstance(im, (np.ndarray, np.generic)):
        if np.max(im) <= 1:
            im = (im*255).astype(np.uint8)
        im = Image.fromarray(im)
    im.save(path)
main
- class score를 loss 함수로 정의한다.
- input image를 최적화 시킨다.
- 반복
1
2
3
4
5
6
7
8
9
10
11
12
13
14
15
16
17
18
19
20
21
22
23
24
25
target_class = 5 # 5th class is dog in cifar10
created_image = np.uint8(np.random.uniform(0, 255, (224, 224, 3)))

if not os.path.exists('../generated'):
    os.makedirs('../generated')

initial_learning_rate = 20
for i in range(1, 150):
    processed_image = preprocess_image(created_image)
    optimizer = SGD([processed_image], lr=initial_learning_rate)
    output = model(processed_image.to(device))
    class_loss = -output[0, target_class]
    print('Iteration:', str(i), 'Loss', "{0:.2f}".format(class_loss.cpu().data.numpy()))

    model.zero_grad()

    class_loss.backward()
    # Update image
    optimizer.step()
    # Recreate image
    created_image = recreate_image(processed_image)
    if i % 10 == 0:
        # Save image
        im_path = '../generated/c_specific_iteration_'+str(i)+'.jpg'
        save_image(created_image, im_path)


