FaceNet 톺아보기
FaceNet 톺아보기
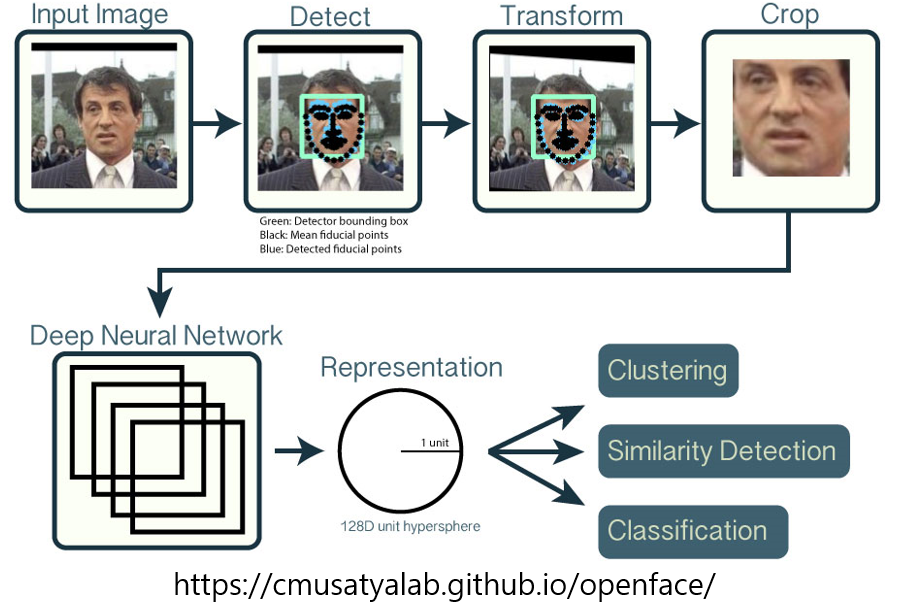
Process of Face Identification
기본적으로 얼굴을 인식하기 위한 과정은
1
2
3
4
5
Face Detection ->
Face Feature Point Detection ->
Face Alignment ->
Face Crop ->
Face Identification
으로 정리 될 수 있다.
FaceNet을 알아보기 전에 얼굴 전처리를 순서대로 알아보자.
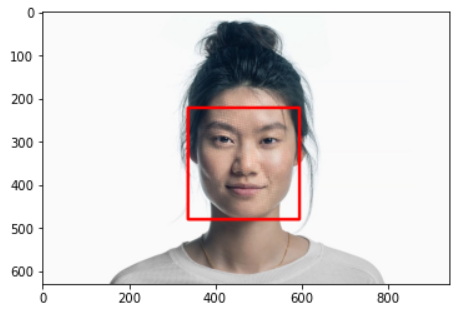
Face Detection
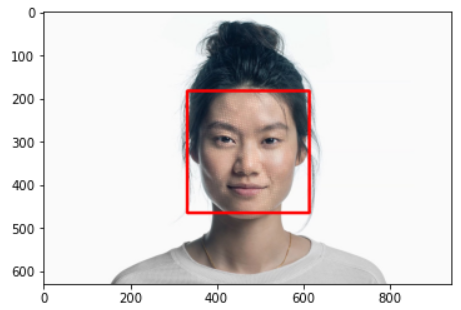
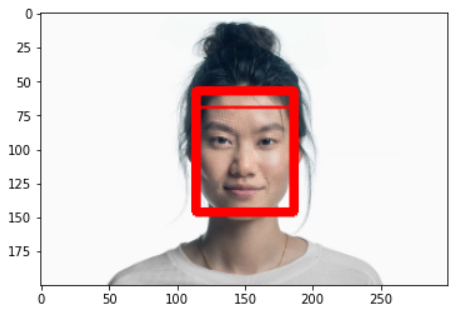
Face Detection을 하기 위해서 가장 많이 사용되는 Opencv와 Dlib 라이브러리를 사용하면 쉽게 할 수 있다.
Opencv - HaarCascade
얼굴 사진과 haar cascades 모델을 준비하면 된다.
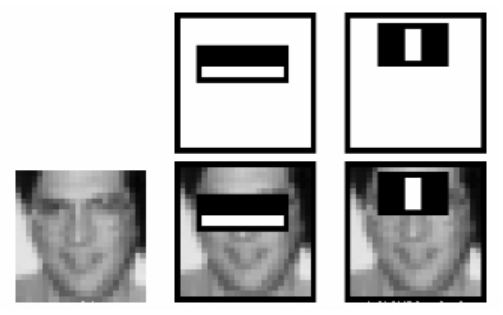
haar cascades는 영역간의 픽셀차이로 얼굴을 검출하는 방법이다. 즉, 밝고 어두움에 따라서 특징을 추출한다. 예를 들어 정면을 볼 때 코가 눈보다 높은 위치에 있기 때문에 눈은 코에 비해 상대적으로 어둡다.
이러한 다양한 특징을 추출하기 위해 다양한 filter를 사용해 이미지를 sliding하여 얼굴 영역을 검출한다.
실제 연산과정과 학습에 관한 설명은 이 곳을 통해서 볼수 있다.
1
2
3
4
5
6
7
8
9
10
11
12
13
14
15
16
17
18
19
20
import cv2
import matplotlib.pyplot as plt

face_img = cv2.imread("test.jpg")

face_detector = cv2.CascadeClassifier("../models/haarcascade_frontalface_default.xml")
faces = face_detector.detectMultiScale(face_img)

for f in faces:
    left = f[0]
    right = f[0] + f[2]
    top = f[1]
    bottom = f[1] + f[3]

    print(f"Left : {left} \t Right : {right} \t Top : {top} \t Bottom : {bottom}")
    cv2.rectangle(face_img, (left, top), (right, bottom), (0, 0, 255), 5)

rgb_face_img = cv2.cvtColor(face_img, cv2.COLOR_BGR2RGB)

plt.imshow(rgb_face_img)
Opencv - DNN
- Opencv 3.1 부터 DNN 모듈을 새롭게 제공
- 추론만 할 수 있도록함
- 지원 framework : caffe, tensorflow, torch, darknet, dldt, onnx
1
2
3
4
5
6
7
8
9
10
11
12
13
14
15
16
17
18
19
20
21
22
23
24
25
26
27
28
29
30
31
32
33
34
35
36
37
38
39
40
41
import dlib
import imutils
import cv2
import matplotlib.pyplot as plt

model_file = "../models/res10_300x300_ssd_iter_140000.caffemodel"
config_file = "../models/deploy.prototxt.txt"

face_img = cv2.imread("test.jpg")

face_detector = cv2.dnn.readNetFromCaffe(config_file, model_file)
face_img = imutils.resize(face_img, width=300) # 224×224, 227×227, 299×299

frame_height, frame_width = face_img.shape[:2]

blob = cv2.dnn.blobFromImage(face_img,
                             scalefactor=1.0,
                             size = (frame_height, frame_width),
                             mean = [104, 117, 123],
                             swapRB = False,
                             crop = False)

face_detector.setInput(blob)
faces = face_detector.forward()

bboxes = []

for i in range(faces.shape[2]):
   confidence = faces[0, 0, i, 2]
   if confidence > 0.9:
       left = int(faces[0, 0, i, 3] * frame_width)
       top = int(faces[0, 0, i, 4] * frame_height)
       right = int(faces[0, 0, i, 5] * frame_width)
       bottom = int(faces[0, 0, i, 6] * frame_height)

       print(f"Left : {left} \t Right : {right} \t Top : {top} \t Bottom : {bottom} \t Confidence : {confidence}")
       cv2.rectangle(face_img, (left, top), (right, bottom), (0, 0, 255), 5)

rgb_face_img = cv2.cvtColor(face_img, cv2.COLOR_BGR2RGB)

plt.imshow(rgb_face_img)
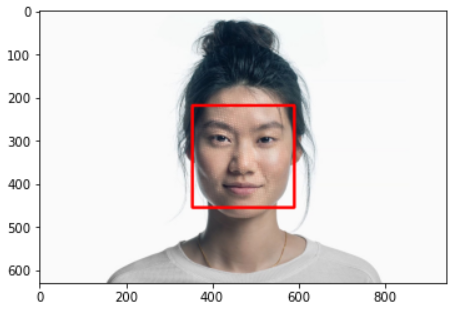
Dlib - Hog + SVM
- 하나의 pixel을 기준으로 어두워지는 방향으로 화살표를 그림(gradient)
- 하나의 pixel당 화살표를 그리면 너무 자세하게 측정되어 흐름을 찾기 어려움
- 이미지를 16 x 16 영역으로 분할하여 화살표를 그림
수많은 얼굴 데이터를 통해 찾은 패턴과 유사한 패턴을 찾아 검출(SVM)
참고자료 : Here
- 정면은 잘 찾지만 측면, 이상한 얼굴은 못찾는다.
1
2
3
4
5
6
7
8
9
10
11
12
13
14
15
16
17
18
19
20
21
import dlib
import cv2
import matplotlib.pyplot as plt

face_img = cv2.imread("test.jpg")

face_detector = dlib.get_frontal_face_detector()
faces = face_detector(face_img)

for f in faces:
    left = f.left()
    right = f.right()
    top = f.top()
    bottom = f.bottom()

    print(f"Left : {left} \t Right : {right} \t Top : {top} \t Bottom : {bottom}")
    cv2.rectangle(face_img, (f.left(), f.top()), (f.right(), f.bottom()), (0, 0, 255), 5)

rgb_face_img = cv2.cvtColor(face_img, cv2.COLOR_BGR2RGB)

plt.imshow(rgb_face_img)
Dlib - CNN
- Hog가 못하는 이상한 얼굴, 측면을 찾을 수 있다.
1
2
3
4
5
6
7
8
9
10
11
12
13
14
15
16
17
18
19
20
21
import dlib
import cv2
import matplotlib.pyplot as plt

face_img = cv2.imread("test.jpg")

face_detector = dlib.cnn_face_detection_model_v1("../models/mmod_human_face_detector.dat")
faces = face_detector(face_img)

for f in faces:
    left = f.rect.left()
    right = f.rect.right()
    top = f.rect.top()
    bottom = f.rect.bottom()

    print(f"Left : {left} \t Right : {right} \t Top : {top} \t Bottom : {bottom}")
    cv2.rectangle(face_img, (f.rect.left(), f.rect.top()), (f.rect.right(), f.rect.bottom()), (0, 0, 255), 5)

rgb_face_img = cv2.cvtColor(face_img, cv2.COLOR_BGR2RGB)

plt.imshow(rgb_face_img)
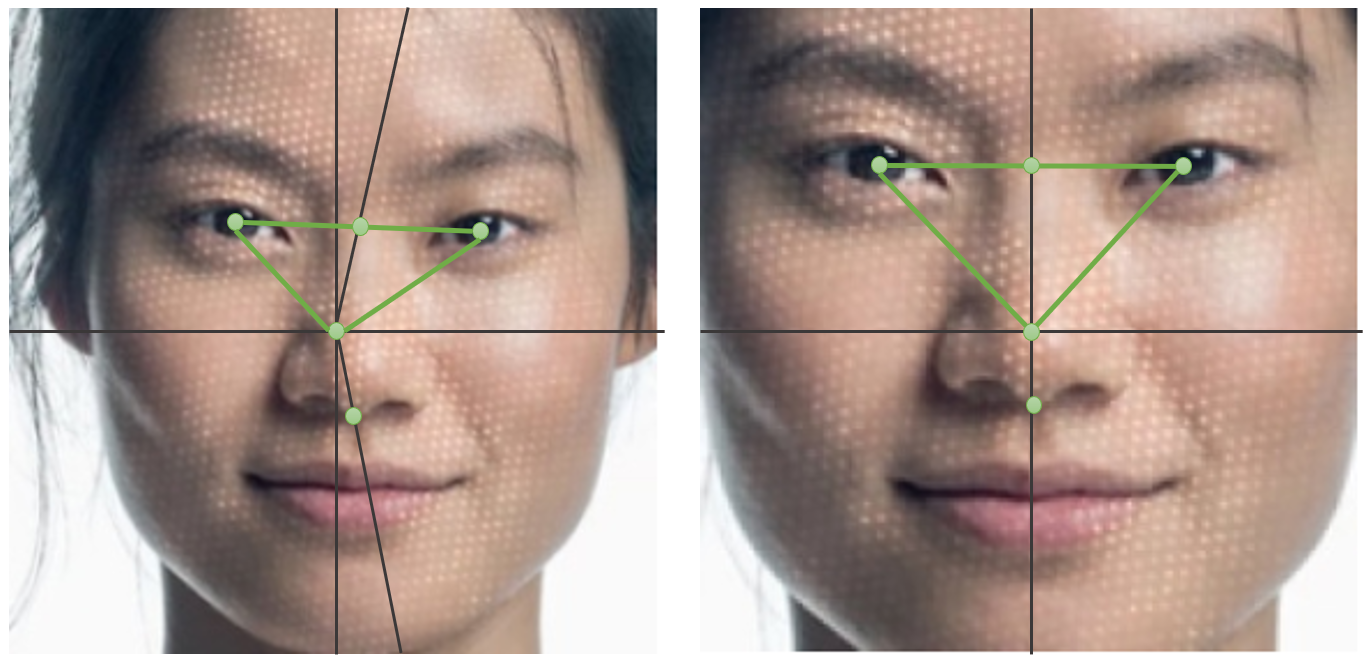
Face Feature Point Detection & Alignment & Crop
- Feature Point Detection : 특징점 추출
- Alignment : 특징점을 기반으로 얼굴 정렬
- Crop : 정렬된 얼굴을 Detection하여 Detection된 영역을 Crop
1
2
3
4
5
6
7
8
9
10
11
12
13
14
15
16
17
18
19
20
21
22
23
24
25
26
27
28
29
30
31
32
33
34
35
36
37
from imutils.face_utils import FaceAligner
from imutils.face_utils import rect_to_bb
import imutils
import dlib
import cv2

detector = dlib.get_frontal_face_detector()
predictor = dlib.shape_predictor("../models/shape_predictor_5_face_landmarks.dat") # 5 point
# predictor = dlib.shape_predictor("../models/shape_predictor_68_face_landmarks.dat") # 68 point
fa = FaceAligner(predictor, desiredFaceWidth=256)

input_image = "test.jpg"
crop_image = "crop.jpg"
align_image = "align.jpg"

image = cv2.imread(input_image)
image = imutils.resize(image, width=800)

gray = cv2.cvtColor(image, cv2.COLOR_BGR2GRAY)
rects = detector(gray, 2)

for rect in rects:
    (x, y, w, h) = rect_to_bb(rect)
    faceOrig = imutils.resize(image[y:y + h, x:x + w], width=256)
    faceAligned = fa.align(image, gray, rect)

    gray = cv2.cvtColor(faceAligned, cv2.COLOR_BGR2GRAY)
    rects = detector(gray, 2)

    for rect in rects:
        (x, y, w, h) = rect_to_bb(rect)
        faceAligned = imutils.resize(faceAligned[y:y + h, x:x + w], width=256)

    cv2.imwrite(crop_image, faceOrig)
    cv2.imwrite(align_image, faceAligned)

    cv2.waitKey(0)
FaceNet
- 얼굴을 전처리하는 과정은 대부분 위에 작업으로 끝낼 수 있다.
- 그렇다면 어떻게 얼굴을 식별할 수 있을까??
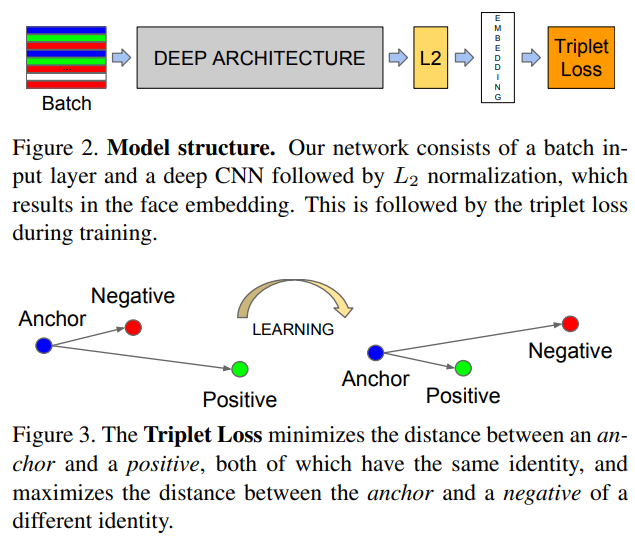
Triplet Loss
- 모델보다는 학습 방법이 중요하다.
- 얼굴 이미지를 벡터화하여서 벡터사이의 거리를 통해 분류하는 방법
- True와는 가까워지고 False와는 멀어지자는 원리
- Loss
- \(x_i^a\) : anchor
- \(x_i^p\) : positive
- \(x_i^n\) : negative
- \(\alpha\) : margin
Triplet Selection
빠르게 수렴하기 위해서 triplet constraint를 위반하는 조건이 좋다. -> 오버피팅을 방지하기 위해서 어려운 샘플을 학습하는게 좋다.
\[argmax_{x_i^p} ||f(x_i^a) - f(x_i^p)||_2^2\] \[argmax_{x_i^n} ||f(x_i^a) - f(x_i^n)||_2^2\]- 어려운 샘플 즉, Hard Positive, Hard Negative를 찾아야하는데.. 전체 데이터셋에 대해 찾기는 어려운 문제! 그래서 2가지 선택사항이 존재한다.
- offine에서 다 찾자.
- online에서 미니배치 뽑을 때 찾자.
- 이 방법을 쓰니 약간 더 빠르게 수렴함 !!
- 위에 식을 semi-hard 라고 하는데 positive distance와 가까운 negative 샘플을 골라서 학습 시킨다.
Evaluation
그럼 이러한 데이터는 어떻게 평가를 하는가?
TA(True Accept) : 같은 사람을 같은 사람이라고 했다.
- FA(False Accept) : 같은 사람이라고 했지만 잘못 분류되었다.
- VAL(Validation Rate)
- FAR(False Accept Rate)
Model Structure
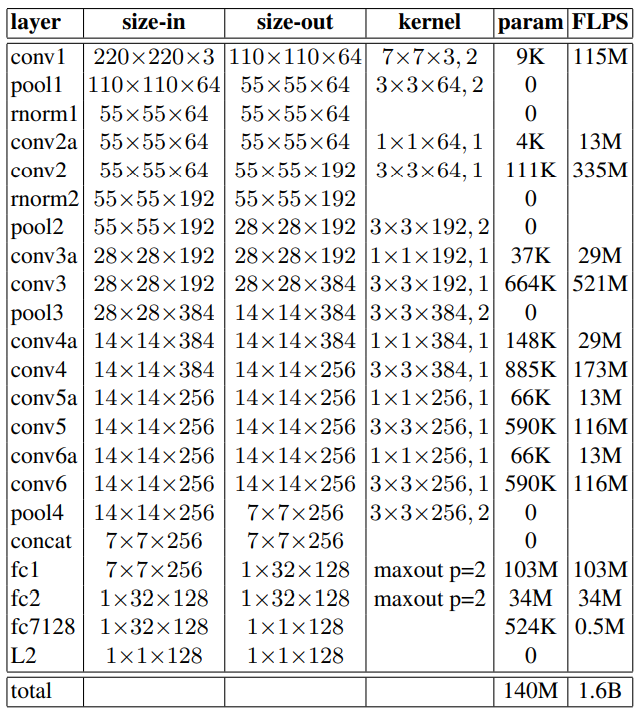
- NN1
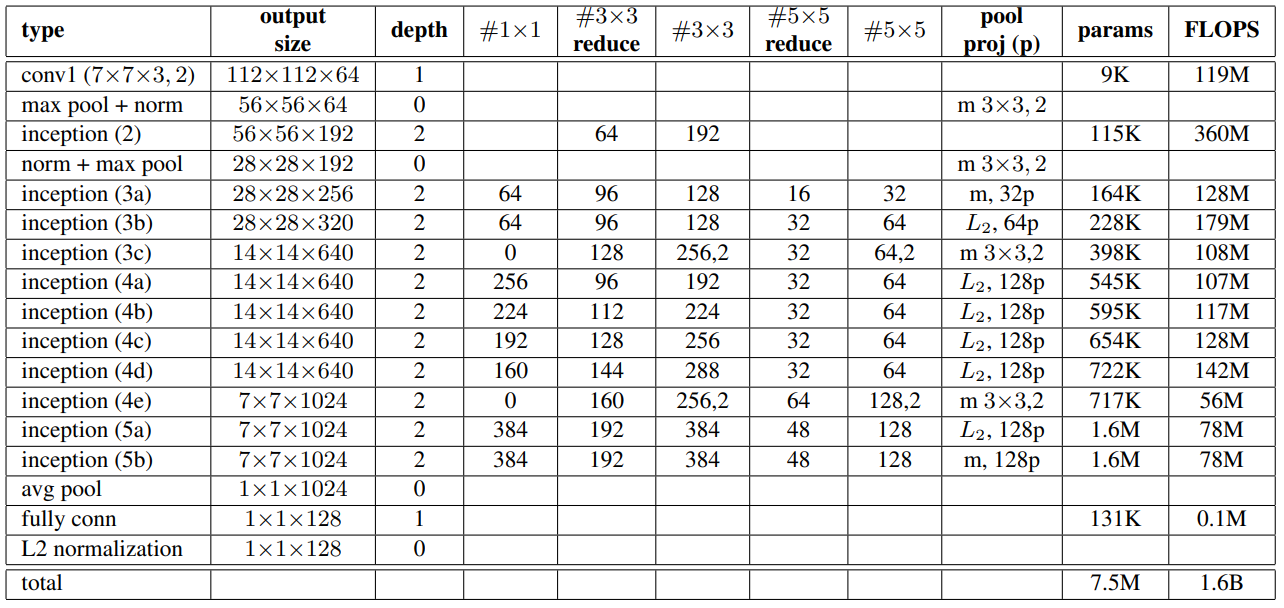
- NN2
- CNN 구조가 inception 변형이라는 것만 알아두고 가도 좋을 것 같다.
NN1
NN2
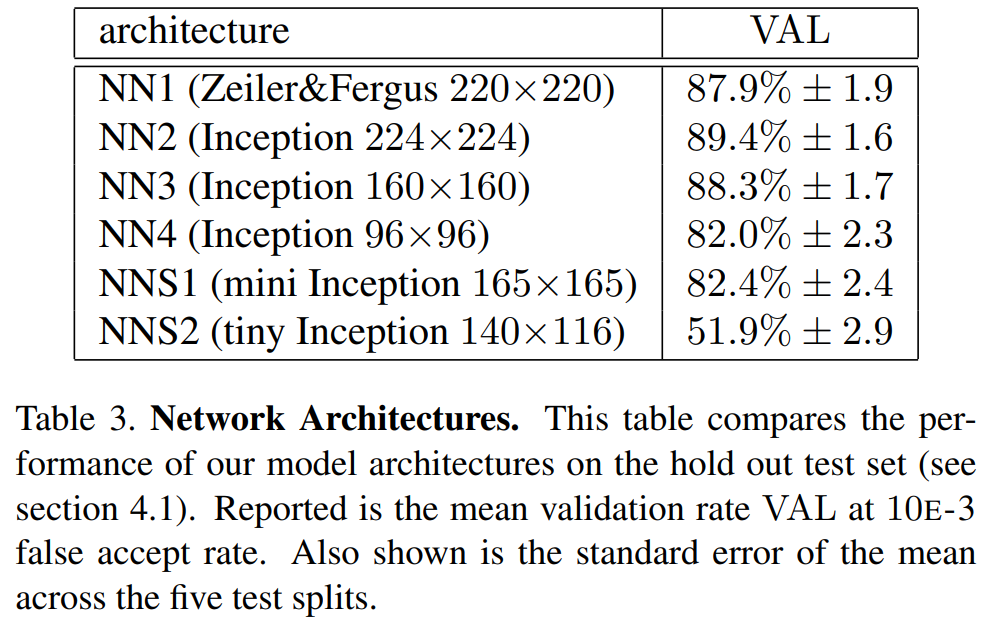
Benchmark
Experiments
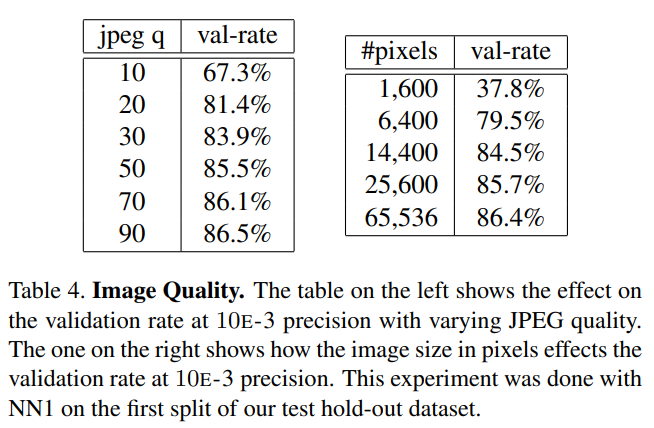
Sensitivity to Image Quality
- 220 x 220 size로 학습시킨 모델에서 image quality는 20% 까지 줄여도 괜찮은 성능을 가진다.
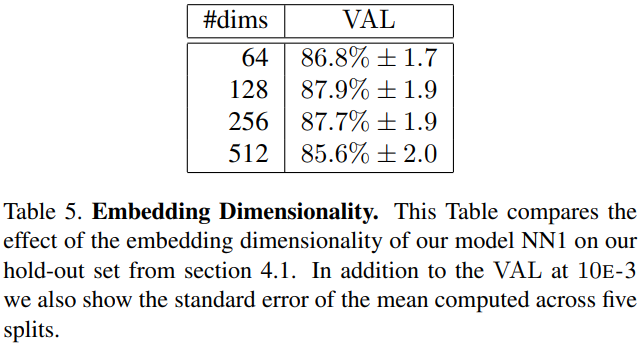
Embedding Dimensionality
- 크다고 좋은건 아니다.
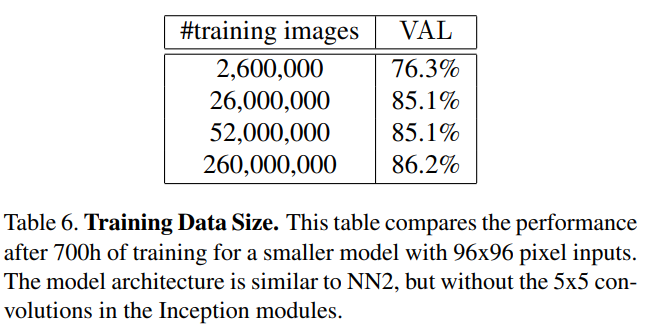
Amount of Training Data
- 학습데이터가 많으면 좋다. 하지만 어느정도에서 수렴할 것이다.
LFW
- 2가지 실험
- Fixed center crop the LFW provided thumnail
- A proprietary face detector is run on the provided LFW thumbnails. If it fails to align the face, the LFW alignment is used.
- 1번 성능 : 98.87% ± 0.15
- 2번 성능 : 99.63% ± 0.09
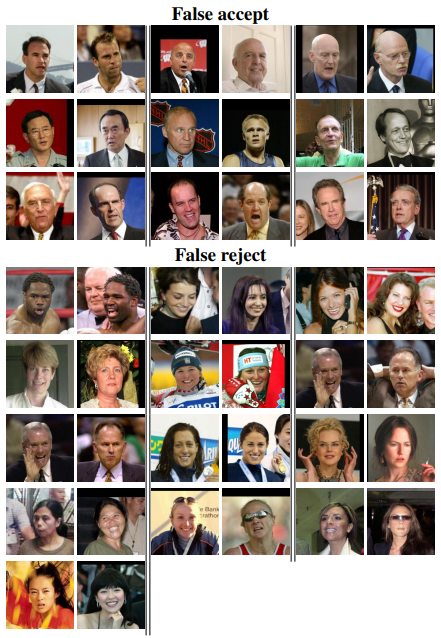
- 실제 사람이 봐도 구분이 어려운 것을 틀렸다.
This post is licensed under CC BY 4.0 by the author.
